Orion Context Brokerの使用
Application Mashup (WireCloud) course @ https://fiware-academy.readthedocs.io/


Presenter Notes
Orion Context Brokerの使用
イントロダクション
Presenter Notes
イントロダクション
FIWARE 対応の一環として、WireCloud はウィジェット/オペレータから Orion Context Broker (FIWARE の Pub/Sub Context Broker GE のリファレンス実装) インスタンスにアクセスするためのサポートを統合しました。このチュートリアルでは、 このサポートの使い方を学びます。
Presenter Notes
Orion Context Brokerの使用
ウィジェットとオペレータへの NGSI サポートの追加
Presenter Notes
ウィジェットとオペレータへの NGSI サポートの追加
まず第一に、WireCloud が提供する JavaScript バインディングを使用して
Orion Context Broker とシームレスに相互運用するために FIWARE NGSI Open RESTful API
にアクセスしたいウィジェットおよびオペレータは、ディスクリプション・ファイル
(config.xml ファイル) に要件として NGSI 機能を追加する必要があります。
Presenter Notes
ウィジェットとオペレータへの NGSI サポートの追加
XML 記述フォーマットの使用
以下は、Mashable Application Component Description Language の XML フレーバーを 使用したウィジェット記述の例です :
<?xml version='1.0' encoding='UTF-8'?>
<widget xmlns="http://wirecloud.conwet.fi.upm.es/ns/macdescription/1" vendor="CoNWeT" name="observation-reporter" version="1.0">
  <details>
    <title>Observation Reporter</title>
    <authors>aarranz</authors>
    <email>aarranz@conwet.com</email>
    <image>images/catalogue.png</image>
    <smartphoneimage>images/smartphone.png</smartphoneimage>
    <description>Creates a new observation</description>
    <doc>http://www.envirofi.eu/</doc>
  </details>
  <requirements>
    <feature name="NGSI"/>
  </requirements>
  <wiring/>
  <contents src="index.html" contenttype="text/html" charset="utf-8" useplatformstyle="true"/>
  <rendering height="20" width="5"/>
</widget>
Presenter Notes
ウィジェットとオペレータへの NGSI サポートの追加
RDF 記述フォーマットの使用
同じウィジェット記述の RDF/xml フレーバーは次のとおりです :
<?xml version="1.0" encoding="utf-8"?>
<rdf:RDF
  xmlns:foaf="http://xmlns.com/foaf/0.1/"
  xmlns:wire="http://wirecloud.conwet.fi.upm.es/ns/widget#"
  xmlns:rdfs="http://www.w3.org/2000/01/rdf-schema#"
  xmlns:usdl="http://www.linked-usdl.org/ns/usdl-core#"
  xmlns:rdf="http://www.w3.org/1999/02/22-rdf-syntax-ns#"
  xmlns:ns1="http://purl.org/goodrelations/v1#"
  xmlns:dcterms="http://purl.org/dc/terms/"
  xmlns:vcard="http://www.w3.org/2006/vcard/ns#"
>
  <wire:Widget rdf:about="http://wirecloud.conwet.fi.upm.es/ns/widget#CoNWeT/observation-reporter/1.0">
    <vcard:addr>
      <vcard:Work rdf:nodeID="Nb17ce611aa2645e488515f86eb855e53">
        <vcard:email>aarranz@conwet.com</vcard:email>
      </vcard:Work>
    </vcard:addr>
    <usdl:utilizedResource>
      <usdl:Resource rdf:about="index.html">
        <wire:codeCacheable>True</wire:codeCacheable>
      </usdl:Resource>
    </usdl:utilizedResource>
    <wire:hasPlatformWiring>
      <wire:PlatformWiring rdf:nodeID="Neecb97db81ed40859b8c04e935a9a9cc"/>
    </wire:hasPlatformWiring>
    <wire:displayName>Observation Reporter</wire:displayName>
    <wire:hasiPhoneImageUri rdf:resource="images/smartphone.png"/>
    <usdl:versionInfo>1.0</usdl:versionInfo>
    <usdl:hasProvider>
      <ns1:BusinessEntity rdf:nodeID="N9a6bf56577c741ac806997a80281afff">
        <foaf:name>CoNWeT</foaf:name>
      </ns1:BusinessEntity>
    </usdl:hasProvider>
    <wire:hasImageUri rdf:resource="images/catalogue.png"/>
    <wire:hasPlatformRendering>
      <wire:PlatformRendering rdf:nodeID="N713e5ea11dce4750a592c754c748def7">
        <wire:renderingHeight>20</wire:renderingHeight>
        <wire:renderingWidth>5</wire:renderingWidth>
      </wire:PlatformRendering>
    </wire:hasPlatformRendering>
    <wire:hasRequirement>
      <wire:Feature rdf:nodeID="N3cb336bd9b6243ecbf345c80442498f9">
        <rdfs:label>NGSI</rdfs:label>
      </wire:Feature>
    </wire:hasRequirement>
    <dcterms:title>observation-reporter</dcterms:title>
    <dcterms:description>Creates a new observation</dcterms:description>
    <dcterms:creator>
      <foaf:Person rdf:nodeID="Ndb72cb5a7f3844b29b72f304baaa14a7">
        <foaf:name>aarranz</foaf:name>
      </foaf:Person>
    </dcterms:creator>
  </wire:Widget>
</rdf:RDF>
Presenter Notes
Orion Context Brokerの使用
NGSI Context Brokers への接続を作成
Presenter Notes
NGSI Context Brokers への接続を作成
NGSI API を利用できるようにする前に、これから使用する NGSI Context Broker との接続を作成する必要があります。これは次のコードで実現できます :
var ngsi_connection = new NGSI.Connection(ngsi_server[, options]);
Presenter Notes
NGSI Context Brokers への接続を作成
サポートされているオプションの完全なリストについては、
NGSI javascript API ドキュメント
を参照してください。ただし、サマリとして、この ngsi_proxy_url オプションは
ウィジェット/オペレータによって処理されるサブスクリプションを作成できるように
するために必要です。IdM 認証を使用して Orion Context Broker に接続している場合も、
必要な認証資格情報を渡す必要があります。これには2つの方法があります :
request_headersオプションを利用して必要な Authentication ヘッダを直接渡します- NGSI API ユーザを現在のユーザの FIWARE の OAuth2 トークン (IdM から WireCloud
によって取得される) にする
use_user_fiware_tokenオプションを利用します。 現在のユーザが有効なトークンを持っていない場合、このオプションを使用して接続に よって行われたリクエストはすべて失敗します (匿名ユーザおよび他の認証バックエンドを 使用して認証されたユーザはこのカテゴリーに入ります)。セキュリティが心配な場合は、 WireCloud の Proxy によるリクエストに OAuth2 トークンが挿入されていることを 考慮に入れてください
Presenter Notes
NGSI Context Brokers への接続を作成
これは、FIWARE Lab で利用可能なリソースを使用した NGSI 接続の作成例です :
var ngsi_connection = new NGSI.Connection('http://orion.lab.fiware.org:1026', {
    use_user_fiware_token: true,
    ngsi_proxy_url: 'https://ngsiproxy.lab.fiware.org'
});
接続を作成したら、NGSI API バインディングを使用できます
(この例では ngsi_connection 変数を介して)。
Presenter Notes
Orion Context Brokerの使用
クエリを実行
Presenter Notes
クエリを実行
クエリは、Orion Context Broker で実行できる最も基本的な操作です。この操作は、 接続オブジェクトのクエリ・メソッドからアクセスできます :
var entityIdList = [
    {type: 'Van', id: '.*', isPattern: true}
];
var attributeList = ['current_position'];
var options = {
    flat: true,
    onSuccess: function (data) {
        // data contains the obtained info
        // from the context broker
    }
};
ngsi_connection.query(entityIdList, attributeList, options);
Presenter Notes
クエリを実行
最初のパラメータは興味のあるエンティティのリストです。この場合、すべての Van
エンティティに興味があります。これは、任意の id にマッチする正規表現を使うことを
可能にする isPattern オプションを使って達成できます。
2つ目は興味を持っている属性のリストです。この場合、その current_position
属性だけに興味があります。ただし、選択したエンティティのすべての属性に関心が
あることを示すために、null または空のリストを渡すことができます。
Presenter Notes
クエリを実行
最後に、すべてのメソッドは、コールバックと追加のオプションを渡すために使用されるべき
options と呼ばれる最後のパラメータをサポートします。NGSI.Connection
のどのメソッドも、少なくとも次のコールバックをサポートしています。
onSuccessは、リクエストが正常に終了したときに呼び出されます。このコールバックに 渡されるパラメータは、呼び出されたメソッドによって異なります。クエリ・オペレーションの 場合、最初のパラメータには、Context Broker へのクエリ後に返されたデータが含まれますonFailureは、リクエストがエラーで終了したときに呼び出されますonCompleteは、リクエストが成功したかどうかにかかわらず、 リクエストが終了したときに呼び出されます
Presenter Notes
クエリを実行
query メソッドは他の追加オプションもサポートします。flat オプションには、
返されたデータを表すために使用されるデータ構造を簡素化するために使用されています。
この単純化は、返されたエントリのセットについて次のことを前提としています :
- エンティティ
idが与えられた場合、そのエンティティの type パラメータには1つの値しかない - エンティティには
idまたはtypeと呼ばれる属性を持っていない - エンティティは特定の
name属性のみを持つ - 属性型は重要ではないか、すでにわかっている
- 属性のメタデータは重要ではないか、すでにわかっている
Presenter Notes
クエリを実行
たとえば、これは flat オプションを使用するときに onSuccess
コールバックに渡されるデータ・パラメータの値です :
 {
    "van1": {
        "id": "van1",
        "type": "Van",
        "current_position": "43.47557, -3.8048315"
    },
    "van2": {
        "id": "van2",
        "type": "Van",
        "current_position": "43.47258, -3.8026643"
    },
    "van3": {
        "id": "van3",
        "type": "Van",
        "current_position": "43.47866, -3.7991238"
    },
    "van4": {
        "id": "van4",
        "type": "Van",
        "current_position": "43.471214, -3.7994885"
    }
}
Presenter Notes
クエリを実行
一方、これは flat が false の場合のデータ・パラメータの値です (デフォルト値) :
 [
    {
        "entity": {
            "id": "van1",
            "type": "Van"
        },
        "attributes": [
            {
                "name": "current_position",
                "type": "coordinates",
                "contextValue": "43.47557, -3.8048315",
                "metadata": [{name: 'location', type: 'string', value: 'WGS84'}]
            }
        ]
    },
    {
        "entity": {
            "id": "van2",
            "type": "Van"
        },
        "attributes": [
            {
                "name": "current_position",
                "type": "coordinates",
                "contextValue": "43.47258, -3.8026643",
                "metadata": [{name: 'location', type: 'string', value: 'WGS84'}]
            }
        ]
    },
    {
        "entity": {
            "id": "van3",
            "type": "Van"
        },
        "attributes": [
            {
                "name": "current_position",
                "type": "coordinates",
                "contextValue": "43.47866, -3.7991238",
                "metadata": [{name: 'location', type: 'string', value: 'WGS84'}]
            }
        ]
    },
    {
        "entity": {
            "id": "van4",
            "type": "Van"
        },
        "attributes": [
            {
                "name": "current_position",
                "type": "coordinates",
                "contextValue": "43.471214, -3.7994885",
                "metadata": [{name: 'location', type: 'string', value: 'WGS84'}]
            }
        ]
    }
]
Presenter Notes
クエリを実行
ページネーション
flat オプションに加えて。この query メソッドは、Orion 0.14.0 以降でサポートされた
ページネーションに関連する他のオプションもサポートします。これらのオプションは
limit, offset および details オプションです。たとえば、次のコードは、最大100個の
エンティティを含む最初のページを取得するために使用できます :
var options = {
    flat: true,
    limit: 100,
    onSuccess: function (data) {
        ....
    }
};
ngsi_connection.query(entityIdList, attributeList, options);
Presenter Notes
クエリを実行
ページネーション
このコードは2ページ目をリクエストします :
var options = {
    flat: true,
    limit: 100,
    offset: 100,
    onSuccess: function (data) {
        ....
    }
};
ngsi_connection.query(entityIdList, attributeList, options);
Presenter Notes
クエリを実行
ページネーション
details オプションを使用してマッチしたエンティティの総数を取得することができます :
var options = {
    flat: true,
    limit: 100,
    offset: 200,
    details: true,
    onSuccess: function (data, details) {
        // The total number of matches is stored in details.count
        ....
    }
};
ngsi_connection.query(entityIdList, attributeList, options);
Presenter Notes
Orion Context Brokerの使用
サブスクリプションの作成
Presenter Notes
サブスクリプションの作成
Context Broker によって提供される最も重要なオペレーションの1つは、 サブスクリプションを作成するためのサポートです。このようにして、システムは システムのエンティティのステータスに関する "リアルタイム" 通知を取得できます。 サブスクリプションはクエリと非常によく似ています。クエリとサブスクリプションの 主な違いは、クエリは同期オペレーションであるということです。さらに、 Orion Context Broker は、同等のクエリ・オペレーションに対して返されるデータを 含む最初の通知を送信します。このように、現在の値とそれらの通知された変更の間に ギャップがないことを知るでしょう。
ウィジェットとオペレータの両方が、
createSubscription
メソッド通してサブスクリプションを作成することができます
Presenter Notes
サブスクリプションの作成
次の例では、バン (vans) の位置の変更について通知する方法について説明します :
var entityIdList = [
    {type: 'Van', id: '.*', isPattern: true}
];
var attributeList = null;
var duration = 'PT3H';
var throttling = null;
var notifyConditions = [{
    type: 'ONCHANGE',
    condValues: ['current_position']
}];
var options = {
    flat: true,
    onNotify: function (data) {
        // called when the context broker sends a new notification
    },
    onSuccess: function (data) {
        ngsi_subscriptionId = data.subscriptionId;
    }
};
ngsi_connection.createSubscription(entityIdList, attributeList, duration, throttling, notifyConditions, options);
Presenter Notes
サブスクリプションの作成
前の例では、この createSubscription の呼び出しは、Van 型のエンティティの
current_position 属性が変更されるたびに Context Broker に onNotify
関数を呼び出させます。実行時に Orion Context Broker がパターンを評価することを
考慮する必要があります。そのため、パターンを使用すると、通知条件が満たされていれば、
新しいエンティティに関する通知を受け取ることができます。
このサブスクリプションは、3時間後に期限切れになり、Context Broker が通知の送信を 停止します。ウィジェット/オペレータは、たとえ期限切れになっていても、 updateSubscription メソッドを使用してそれらのサブスクリプションを更新できます。 cancelSubscription メソッドを使用してサブスクリプションをキャンセルすると、Context Broker はサブスクリプションに関する情報を解放できます。いずれにせよ、 ウィジェット/オペレータがアンロードされると、WireCloud は自動的に サブスクリプションをキャンセルします。
Presenter Notes
サブスクリプションの作成
クエリ・オペレーションと同様に、サブスクリプションを作成するときにこの flat
オプションを使用できます。createSubscription メソッドによって行われる仮定は、
query メソッドによって使用されるものと同じになります。変更される唯一のことは、
これが成功コールバックにではなく通知コールバックに渡されるパラメータに影響を
与えるということです。
Presenter Notes
サブスクリプションの作成
例として、これは、flat オプションを使用するときに onNotify
コールバックに渡されるデータ・パラメータの値です :
{
    "elements": {
        "van2": {
            "id": "van2",
            "type": "Van",
            "current_position": "43.47258, -3.8026643"
        },
        "van4": {
            "id": "van4",
            "type": "Van",
            "current_position": "43.471214, -3.7994885"
        }
    },
    "subscriptionId": "53708768286043030c116e2c",
    "originator": "localhost"
}
Presenter Notes
サブスクリプションの作成
一方、これは flatが false の場合のデータ・パラメータの値です (デフォルト値) :
{
    "elements": [
        {
            "entity": {
                "id": "van2",
                "type": "Van"
            },
            "attributes": [
                {
                    "name": "current_position",
                    "type": "coordinates",
                    "contextValue": "43.47258, -3.8026643"
                }
            ]
        },
        {
            "entity": {
                "id": "van4",
                "type": "Van"
            },
            "attributes": [
                {
                    "name": "current_position",
                    "type": "coordinates",
                    "contextValue": "43.471214, -3.7994885"
                }
            ]
        }
    },
    "subscriptionId": "53708768286043030c116e2c",
    "originator": "localhost"
}
Presenter Notes
Orion Context Brokerの使用
エンティティの作成とその属性の更新
Presenter Notes
エンティティの作成とその属性の更新
ウィジェットとオペレータは updateAttributes および
addAttributes メソッドを使用してエンティティを
更新できます。updateAttributes および addAttributes メソッドは、
そのパラメータに同じフォーマットを使用し、主な違いは、必要に応じて
addAttribute メソッドが新しい属性/エンティティを作成するのに対し、
参照されたエンティティ/属性が存在しないと updateAttributes
は失敗するということです。
Presenter Notes
エンティティの作成とその属性の更新
たとえば、次のコードは、van1 エンティティの position 属性が存在する場合は
それを更新し、存在しない場合は属性またはエンティティを作成します :
ngsi_connection.addAttributes([{
        entity: {id: 'van1', type: 'Van'},
        attributes: [
            {
                type: 'string',
                name: 'current_position',
                contextValue: coordinates
            }
        ]
    }], {
        onSuccess: function (accepted_changes, unaccepted_changes) {
            // The Orion Context Broker processed the request successfully
            if (unaccepted_changes.length === 0) {
                // Van created/updated successfully
                ...
            } else {
                // Something went wrong
            }
        }.bind(this),
        onFailure: function (error) {
            // General failure when creating/updating the van
        },
        onComplete: function () {
            //
        }.bind(this)
    }
);
Presenter Notes
エンティティの作成とその属性の更新
onSuccess コールバックの response_data パラメータは、Orion Context Broker
によって返されたときに受け付けられた変更の概要です。この情報は、リクエストが
正常に終了したときに updateAttributes/addAttribute メソッドに提供される情報と
非常によく似ているため、通常は無視できます。すべてうまくいけば、unaccepted_changes
パラメータには空の配列が含まれます。問題が発生した場合、unaccepted_changes
パラメータには変更が拒否されたことに関するすべての情報が含まれます。
承認されていない変更は Orion Context Broker によって個別に処理されるため、
onFailure コールバックは未承認の変更を報告するために呼び出されないため、
これを考慮することは非常に重要です。
Presenter Notes
エンティティの作成とその属性の更新
たとえば、次のコードを実行したとします :
ngsi_connection.updateAttributes([
        {
            'entity': {type: 'City', id: 'Madrid'},
            'attributes': [
                {name: 'position', type: 'coords', contextValue: '40.418889, -3.691944'}
            ]
        },
        {
            'entity': {type: 'Point', id: 'A'},
            'attributes': [
                {name: 'mobile_phone', type: 'string', contextValue: '0034223456789'}
            ]
        }
    ],
    ...
    );
Presenter Notes
エンティティの作成とその属性の更新
マドリッドと A の両方のエンティティが存在しますが position 属性のみが存在する
という事実を考えると、accepted_changes の値は次のようになります :
[
    {
        entity: {id: 'Madrid', type: 'City'},
        attributes: [
            {name: 'position', type: 'coords'}
        ]
    }
]
Presenter Notes
エンティティの作成とその属性の更新
unaccepted_changes パラメータの値はこれに似たものになります :
[
    {
        entity: {id: 'A', type: 'Point'},
        attributes: [
            {name: 'mobile_phone', type: 'string'}
        ],
        statusCode: {
            code: 472,
            reasonPhrase: 'request parameter is invalid/not allowed',
            details : 'action: UPDATE - entity: (A, Point) - offending attribute: mobile_phone'
        }
    }
]
Presenter Notes
Orion Context Brokerの使用
Orionのジオロケーション機能の使用
Presenter Notes
Orionのジオロケーション機能の使用
次のコード・スニペットは、エンティティの場所を定義するために使用されることを示す
position 属性を作成する方法の例を示しています :
ngsi_connection.addAttributes([
        {
            entity: {type: 'City', id: 'Madrid'},
            attributes: [
                {
                    name: 'position',
                    type: 'coords',
                    contextValue: '40.418889, -3.691944',
                    metadata: [
                        {name: 'location', type: 'string', value: 'WGS84'}
                    ]
                }
            ]
        }
    ],
    ...
    );
Presenter Notes
Orionのジオロケーション機能の使用
その後、ジオロケーション・クエリを発行できます。例えば :
connection.query([
        {type: 'City', id: '.*', isPattern: true}
    ],
    null,
    {
        restriction: {
            scopes: [
                {
                    type: "FIWARE_Location",
                    value: {
                        circle: {
                            centerLatitude: "40.418889",
                            centerLongitude: "-3.691944",
                            radius: "14000"
                        }
                    }
                }
            ]
        },
        ...
     });
Presenter Notes
Orionのジオロケーション機能の使用
または :
connection.query([
        {type: 'Point', id: '.*', isPattern: true}
    ],
    null,
    {
        restriction: {
            scopes: [
                {
                    type : "FIWARE_Location",
                    value : {
                        polygon: {
                            vertices: [
                                { latitude: "0", longitude: "0" },
                                { latitude: "0", longitude: "6" },
                                { latitude: "6", longitude: "0" }
                            ],
                            inverted: true
                        }
                    }
                }
            ]
        },
        ...
    });
Presenter Notes
Orion Context Brokerの使用
実例
Presenter Notes
実例
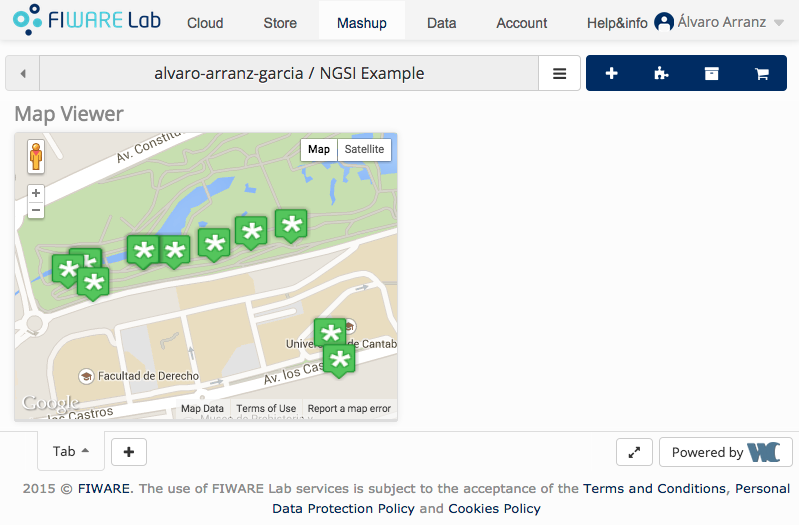
NGSI の機能を確認するために、この機能を使用した例を示します。実行したい場合は、 次のマッシュアップを WireCloud にアップロードする必要があります :
このマッシュアップは以下のコンポーネントを使用します :
アップロードが完了したら、このマッシュアップをテンプレートとして使用して 新しいワークスペースを作成できます。この例は、 FIWARE Lab で機能することを意図していることを考慮に入れてください。
もう1つの例は、FIWARE Lab のストアで入手可能な Orion Context Broker に関連するすべての汎用ウィジェットとオペレータ、およびいくつかの サンプル・マッシュアップを含む OrionStarterKit のオファリングです。
Presenter Notes
実例
すべて問題なければ、サンタンデール市の街灯の場所を含め、 次のようなマップが表示されます。

Presenter Notes


